nginx-rtmp-moduleを使う必要が出てきたため挙動を確認する。
要求
機能要件
- OBSからRTMPのリクエストを受け取れる
- flvファイルが生成される
構成
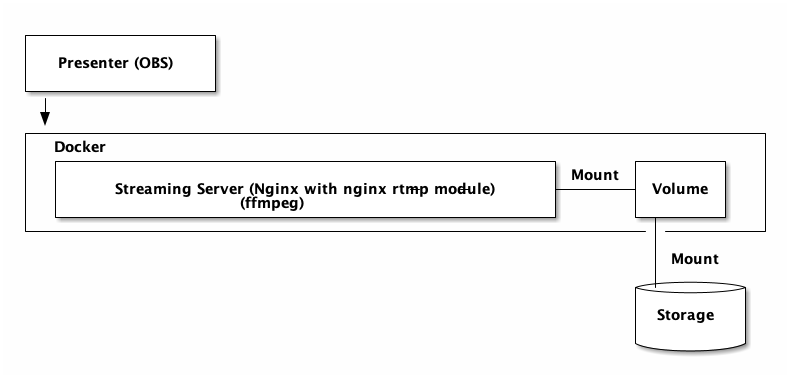
エンコードツールからデータを受け取リそれを加工するところまでの構成を検証することが目的である。わかりやすさを優先し、可能な限りシンプルな構成した。そのため多重接続や冗長化などについては一切考慮していない。
大まかなに以下のような処理の流れとなる。
- OBS1を用いてRTMPを送信する。
- OBSから送信されたRTMPはDocker内で動作するNginxが受信する。
- Nginxが受信したデータをnginx-rtmp-moduleの機能によりFLVファイルとしてストレージに保存する。

Dockerfile
Nginx用のDocker Imageにはnginx-rtmp-moduleを追加する必要がある。そのためにNginxをコンパイルし直す必要があるため、Nginxの公式のImageを用いず、Debianをベースにビルドした。
マルチステージビルドにして生成物のみを取り込むようにすれば現状のImageサイズをもっと小さくできるが、今回は検証用のためそこまで行っていない。
# image: nginx-rtmp
FROM debian:bullseye
RUN apt-get update && apt-get dist-upgrade -q -y
RUN apt-get install -y ca-certificates
RUN apt-get install -y openssl
RUN apt-get install -y libssl-dev
RUN apt-get install -y curl
RUN apt-get install -y gnupg
RUN apt-get install -y build-essential

RUN curl -o nginx-1.21.4.tar.gz https://nginx.org/download/nginx-1.21.4.tar.gz
RUN curl -o nginx-1.21.4.tar.gz.asc https://nginx.org/download/nginx-1.21.4.tar.gz.asc
RUN curl -o nginx-rtmp-module-v1.2.2.tar.gz https://codeload.github.com/arut/nginx-rtmp-module/tar.gz/refs/tags/v1.2.2

RUN mkdir -p /tmp/build
WORKDIR /tmp/build
RUN tar -zxvf /nginx-1.21.4.tar.gz
RUN tar -zxvf /nginx-rtmp-module-v1.2.2.tar.gz

WORKDIR /tmp/build/nginx-1.21.4

RUN apt-get install -y libpcre3 libpcre3-dev
RUN apt-get install -y zlib1g zlib1g-dev
RUN ./configure \
    --sbin-path=/usr/local/sbin/nginx \
    --conf-path=/etc/nginx/nginx.conf \
    --error-log-path=/var/log/nginx/error.log \
    --pid-path=/var/run/nginx/nginx.pid \
    --lock-path=/var/lock/nginx/nginx.lock \
    --http-log-path=/var/log/nginx/access.log \
    --http-client-body-temp-path=/tmp/nginx-client-body \
    --with-http_ssl_module \
    --with-threads \
    --with-ipv6 \
    --add-module=/tmp/build/nginx-rtmp-module-1.2.2
RUN make -j $(getconf _NPROCESSORS_ONLN)
RUN make install
RUN apt-get install -y ffmpeg
RUN mkdir -p /var/lock/nginx
RUN ln -sf /dev/stdout /var/log/nginx/access.log
RUN ln -sf /dev/stderr /var/log/nginx/error.log
COPY nginx/nginx.conf /etc/nginx/nginx.conf
VOLUME /data/hls
EXPOSE 1935
EXPOSE 80
CMD ["nginx", "-g", "daemon off;"]
Nginx
Nginx設定はnginx-rtmp-moduleのREADMEに掲載しているものをそのまま利用した。
events {
    worker_connections  1024;
}


rtmp {

    server {

        listen 1935;

        chunk_size 4000;

        # TV mode: one publisher, many subscribers
        application mytv {

            # enable live streaming
            live on;

            # record first 1K of stream
            record all;
            record_path /data;
            record_max_size 1K;

            # append current timestamp to each flv
            record_unique on;

            # publish only from localhost
            allow publish 127.0.0.1;
            deny publish all;

            #allow play all;
        }

        # Transcoding (ffmpeg needed)
        application big {
            live on;

            # On every pusblished stream run this command (ffmpeg)
            # with substitutions: $app/${app}, $name/${name} for application & stream name.
            #
            # This ffmpeg call receives stream from this application &
            # reduces the resolution down to 32x32. The stream is the published to
            # 'small' application (see below) under the same name.
            #
            # ffmpeg can do anything with the stream like video/audio
            # transcoding, resizing, altering container/codec params etc
            #
            # Multiple exec lines can be specified.

            exec ffmpeg -re -i rtmp://localhost:1935/$app/$name -vcodec flv -acodec copy -s 32x32
                        -f flv rtmp://localhost:1935/small/${name};
        }

        application small {
            live on;
            # Video with reduced resolution comes here from ffmpeg
        }

        application webcam {
            live on;

            # Stream from local webcam
            exec_static ffmpeg -f video4linux2 -i /dev/video0 -c:v libx264 -an
                               -f flv rtmp://localhost:1935/webcam/mystream;
        }

        # application mypush {
        #     live on;

        #     # Every stream published here
        #     # is automatically pushed to
        #     # these two machines
        #     push rtmp1.example.com:1934;
        #     push rtmp2.example.com:1934;
        # }

        # application mypull {
        #     live on;

        #     # Pull all streams from remote machine
        #     # and play locally
        #     pull rtmp://rtmp3.example.com pageUrl=www.example.com/index.html;
        # }

        # application mystaticpull {
        #     live on;

        #     # Static pull is started at nginx start
        #     pull rtmp://rtmp4.example.com pageUrl=www.example.com/index.html name=mystream static;
        # }

        # video on demand
        application vod {
            play /data;
        }

        application vod2 {
            play /data;
        }

        # Many publishers, many subscribers
        # no checks, no recording
        application videochat {

            live on;

            # The following notifications receive all
            # the session variables as well as
            # particular call arguments in HTTP POST
            # request

            # Make HTTP request & use HTTP retcode
            # to decide whether to allow publishing
            # from this connection or not
            on_publish http://localhost:8080/publish;

            # Same with playing
            on_play http://localhost:8080/play;

            # Publish/play end (repeats on disconnect)
            on_done http://localhost:8080/done;

            # All above mentioned notifications receive
            # standard connect() arguments as well as
            # play/publish ones. If any arguments are sent
            # with GET-style syntax to play & publish
            # these are also included.
            # Example URL:
            #   rtmp://localhost/myapp/mystream?a=b&c=d

            # record 10 video keyframes (no audio) every 2 minutes
            record keyframes;
            record_path /data;
            record_max_frames 10;
            record_interval 2m;

            # Async notify about an flv recorded
            on_record_done http://localhost:8080/record_done;

        }


        # HLS

        # For HLS to work please create a directory in tmpfs (/tmp/hls here)
        # for the fragments. The directory contents is served via HTTP (see
        # http{} section in config)
        #
        # Incoming stream must be in H264/AAC. For iPhones use baseline H264
        # profile (see ffmpeg example).
        # This example creates RTMP stream from movie ready for HLS:
        #
        # ffmpeg -loglevel verbose -re -i movie.avi  -vcodec libx264
        #    -vprofile baseline -acodec libmp3lame -ar 44100 -ac 1
        #    -f flv rtmp://localhost:1935/hls/movie
        #
        # If you need to transcode live stream use 'exec' feature.
        #
        application hls {
            live on;
            hls on;
            hls_path /tmp/hls;
        }

        # MPEG-DASH is similar to HLS

        application dash {
            live on;
            dash on;
            dash_path /tmp/dash;
        }
    }
}

# HTTP can be used for accessing RTMP stats
http {

    server {

        listen      8080;

        # This URL provides RTMP statistics in XML
        location /stat {
            rtmp_stat all;

            # Use this stylesheet to view XML as web page
            # in browser
            rtmp_stat_stylesheet stat.xsl;
        }

        location /stat.xsl {
            # XML stylesheet to view RTMP stats.
            # Copy stat.xsl wherever you want
            # and put the full directory path here
            root /path/to/stat.xsl/;
        }

        location /hls {
            # Serve HLS fragments
            types {
                application/vnd.apple.mpegurl m3u8;
                video/mp2t ts;
            }
            root /tmp;
            add_header Cache-Control no-cache;
        }

        location /dash {
            # Serve DASH fragments
            root /tmp;
            add_header Cache-Control no-cache;
        }
    }
}
起動
Dockerコマンドを用いて起動するようにした。
#! /usr/bin/env bash

exec docker run -it --rm \
     --privileged=true \
     --publish="127.0.0.1:80:80" \
     --publish="127.0.0.1:1935:1935" \
     --expose="80" \
     --expose="1935" \
     --volume "$(pwd)/data:/data" \
     --workdir="/workdir" \
     --volume "$(pwd):/workdir" \
     --volume "$(pwd)/nginx:/etc/nginx" \
     nginx-rtmp \
     "$@"
OBSの配信設定
OBSの設定は以下のようになる。これはNginxの設定に依存する。
| 設定項目 | 設定値 |
|---|---|
| サービス | カスタム |
| サーバー | rtmp://localhost:1935/mytv |
| ストリームキー | sample1 (任意) |
手順と確認項目
以下の手順を行い、確認項目を満たしていることを確認した。
- コンテナを起動する。
- OBSの設定をする。
OBSで配信開始ボタンを押す。
- 配信が開始される。
- flvファイルが作成される。